The fastest safe way to shrink a large image is a tool that resamples on your own device with a Lanczos-class filter — no upload, no queue, no server copy. For a single image, FileMint's Image Resizer covers it: pick a target width or a percentage, confirm the aspect-ratio lock, and download. That is the whole workflow. The rest of this guide is for when the defaults are not enough — quality settings, batches, format choice, and the environment-specific steps.
Decode locally
Canvas reads the file in memory
Resample
Lanczos3 at locked aspect ratio
Re-encode & save
WebP, JPEG, or PNG to your device
How do you downscale a large image in four steps?
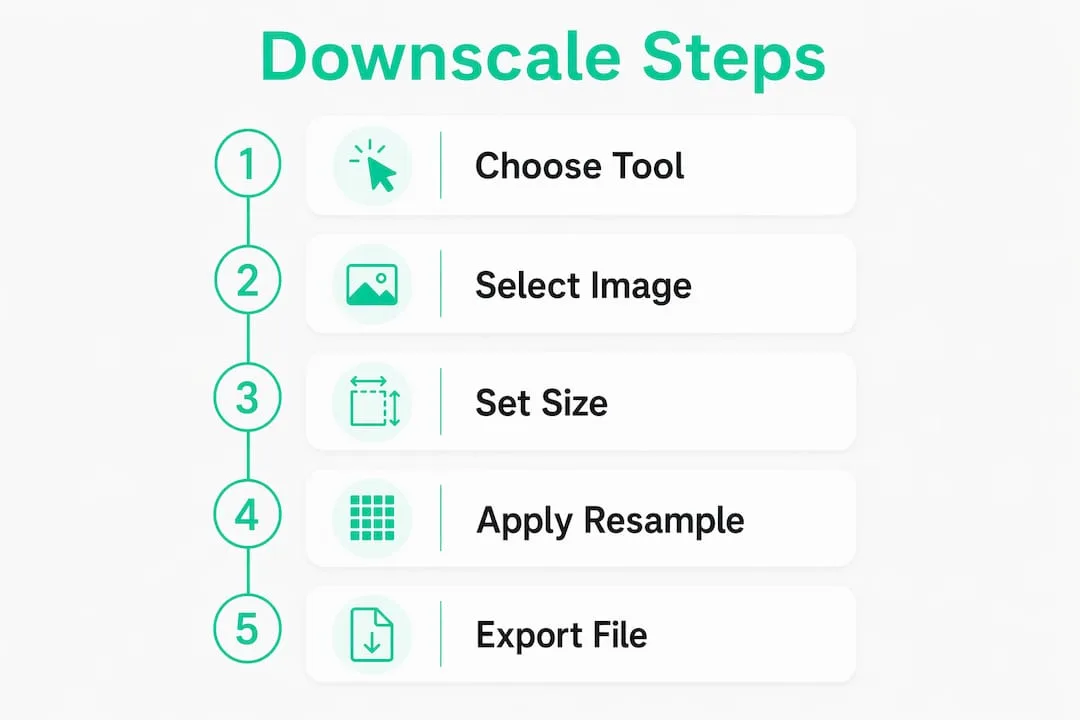
This sequence works in any tool:
- Pick a tool that processes on your device.FileMint's Image Resizer, macOS Preview, and GIMP all qualify. Avoid upload-based services when the image is personal or sensitive.
- Set the target.Either a pixel width — 1920px for full HD, 1280px for standard web, 800px for email — or a percentage, where 50% halves both dimensions. Common presets: 1080×1080 for Instagram, 1200×628 for Open Graph.
- Lock the aspect ratio. Every serious tool has this toggle. Unlocked, you get stretched output.
- Choose format and quality, then export. JPEG at 75–85 for photos, lossless PNG for graphics with transparency, WebP for the web. Open the result and check both pixel dimensions and file size before you use it anywhere.
Reducing by more than half? Halve in successive passes — 5334px to 2667px to 1334px to 800px — then apply one light sharpening pass. This holds edges better than a single aggressive step, because each pass gives the filter a smaller ratio to resolve.
Browser, web upload, or desktop app?
The right environment depends on what you are optimising for.
Local and browser-first tools
- Files never leave the device
- No account or subscription
- Fast for single images and small batches
- Client-side resampling at Lanczos-class quality
- Limit:bounded by browser memory on very large files, typically above 50–100 MB
Web upload services
- Nothing to install, and they often accept unusual input formats
- Cost: the image is transmitted to a third party
- Cost: server logs may retain metadata or thumbnails after you delete the file
Desktop applications
- Best for large batches and specialist formats such as RAW
- Full DPI and colour-profile control
- Offline batch processing with no upload ceiling
- Cost: installation, and a steeper learning curve
| Use case | Best environment |
|---|---|
| Medical, legal, or personal photos | Local or browser-first tool |
| One-off resize for web or email | Browser tool |
| 100+ images with format conversion | Desktop app or ImageMagick |
| Print or ID photo with a DPI requirement | Desktop app with DPI controls |
| Team with a no-install policy | Browser tool |
Step-by-step by environment
FileMint Image Resizer
- Open the Image Resizer.
- Drop the image in. Processing starts locally; nothing is sent anywhere.
- Choose a preset or enter custom pixel dimensions, or switch to percentage mode.
- Confirm the aspect-ratio lock is on.
- Pick the output format — WebP for the web, JPEG for compatibility, PNG for transparency.
- Download. The file saves straight to your device.
One behaviour worth knowing: Canvas normalises colour to sRGB during the resize, so an HDR source is tone-mapped to SDR on output. That is expected, not a defect.
Windows Photos
Open the image, use the three-dot menu and Resize image, choose a preset or custom size, then save a copy. Photos exposes no resampling control, so for quality-critical work use GIMP or a browser tool instead.
macOS Preview
Tools → Adjust Size, set the width in pixels, keep Scale proportionally checked, then File → Export. For print set 300 DPI; for screen, DPI is irrelevant.
Photoshop and GIMP
Photoshop: Image → Image Size, set pixel dimensions, set Resample to Bicubic Sharper for reductions, then Export As.
GIMP: Image → Scale Image, enter the target size, set Interpolation to Lanczos, then File → Export As.
How do you resize many images at once?
- Back up the originals to a separate folder first.
- Pick a method. In the browser, drop multiple files into the Image Resizer and apply one shared preset — each finished image downloads as its own file. On macOS, an Automator workflow with the Scale Images action runs over a folder. On the command line,
mogrify -resize 1920x1080\> -quality 82 *.jpgfits every JPEG inside 1920×1080 without upscaling. - Preview one output before committing to the whole batch.
- Spot-check three to five files from different points in the batch, especially if the sources varied in size or orientation.
Originals backed up to a separate folder
Output folder set
Never write over the source files
Aspect-ratio lock confirmed
Format and quality preset chosen
One sample output reviewed at 100% zoom
Very large sources moved to a desktop tool
Browser tools struggle above roughly 50 MB or 8000x8000 pixels
How do you preserve quality when reducing dimensions?
Bad downscales nearly always trace to the resampling filter. Lanczos3 is the accepted best compromise between sharpness, aliasing suppression, and ringing for photographic reduction. In a browser, setting imageSmoothingQuality to 'high' selects a Lanczos-class filter.
- Use Lanczos, or
'high'smoothing, for every reduction - Lock the aspect ratio unless you have a specific reason not to
- Keep web output in sRGB — Canvas does this for you
- JPEG quality 75–85 for photographs; below 70 blocking becomes visible
- Lossless PNG for graphics, logos, and anything with transparency
- WebP or AVIF for the web where browser support allows
- Check the result at 100% zoom before you share it
Which output format should you pick?
| Format | Best for | Transparency | Quality vs size |
|---|---|---|---|
| JPEG | Photographs, universal compatibility | No | Lossy; good at 75–85 |
| PNG | Graphics, logos, screenshots | Yes | Lossless; larger files |
| WebP | Web images where size matters | Yes | Smaller than JPEG at similar quality |
| AVIF | Maximum compression | Yes | Best compression; slowest to encode |
- Editorial photos: WebP at quality 80, JPEG fallback for older platforms.
- Email: JPEG at 75–80, width under 600px, under 200 KB.
- Social: start from a clean high-quality source — most platforms re-compress on upload regardless.
- Logos and UI: PNG or SVG. Never JPEG for flat colour; artefacts show at every colour boundary.
- Archive: keep the original. Export a distribution copy; never overwrite the source.
Why local processing is the stronger default
Upload an image to a server-side tool and you lose control of it the moment it leaves the browser. Logs, third-party APIs, and retention policies all become someone else's decision. Only tools documented as local-only can actually promise no transmission — and you can verify the claim by watching the network tab, or simply disabling Wi-Fi mid-resize.
This is not only a privacy preference; it is architecturally sound. The browser Canvas API, as specified in the WHATWG HTML Living Standard, resamples at quality matching dedicated desktop software. There is no quality penalty for staying local. If you also need to strip location and camera data before sharing, the metadata remover handles that, and the image compressor reduces file size when the pixel dimensions should stay as they are.
Common problems and quick fixes
Fuzzy or soft output. The filter was bilinear or nearest-neighbour. Switch to Lanczos, Bicubic Sharper in Photoshop, or a browser tool using 'high' smoothing. Still soft after a very large reduction? Use multi-pass halving.
Wrong dimensions. Check the aspect-ratio lock, then check input DPI — some tools factor density into output size. Work in pixels for predictable results.
File still large. Re-encode to WebP or drop JPEG quality to 75–80; strip EXIF, which can be several hundred kilobytes on a phone photo; and confirm you exported the resized copy rather than the original.
DPI versus pixels.For screens, only pixel count matters. For print or official forms you must match both dimensions and density: pixels = (centimetres × DPI) / 2.54.
Key takeaways
- Process on your device. A browser-first resizer keeps the file local, with no upload and no account.
- Lock the aspect ratio every time. Unlocked resizing distorts.
- Choose Lanczos. Or
imageSmoothingQuality = 'high'in a browser. - Match format to purpose. JPEG 75–85 for photos, lossless PNG for graphics, WebP or AVIF for the web.
- Halve in stages for reductions below roughly a quarter of the original, then sharpen once.
Resize without uploading anything
No server, no account, no queue. Decoding, resampling, and encoding all happen on your device, with WebP, JPEG, or PNG output and the aspect-ratio lock on by default.
Open the Image ResizerReferences
- MDN — CanvasRenderingContext2D.imageSmoothingQuality — the
low,medium, andhighvalues and what they map to. - WHATWG HTML Living Standard — Canvas — the drawImage pipeline and colour-space handling.
- FileMint — Image compression guide — compression workflows and quality/size trade-offs.
- FileMint — AVIF vs WebP — encode speed, browser support, and when to prefer each.